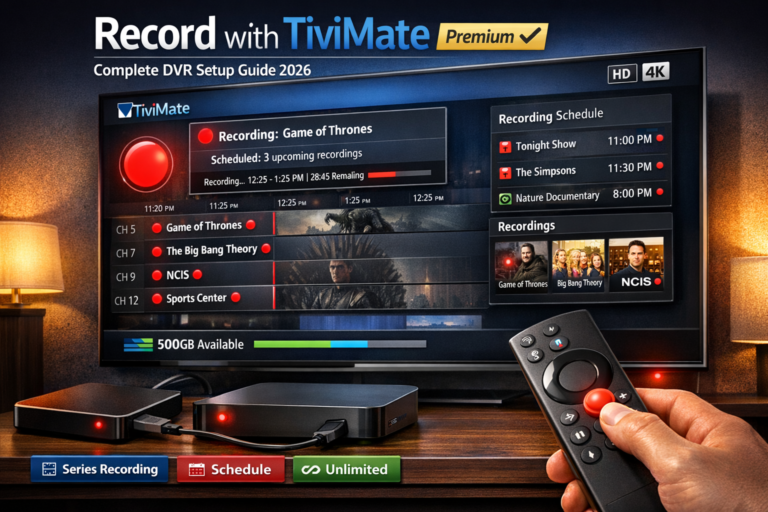
Record with TiviMate Premium transforms your IPTV setup into a full-featured DVR system that rivals cable company equipment. Never miss your favorite shows, sports events, or movies again with TiviMate’s powerful recording capabilities that work seamlessly with most IPTV services.
After helping hundreds of users set up their recording systems, I’m sharing the complete guide to recording with TiviMate Premium from initial setup to advanced scheduling, storage management, and troubleshooting common issues.
Why TiviMate Premium is Required for Recording
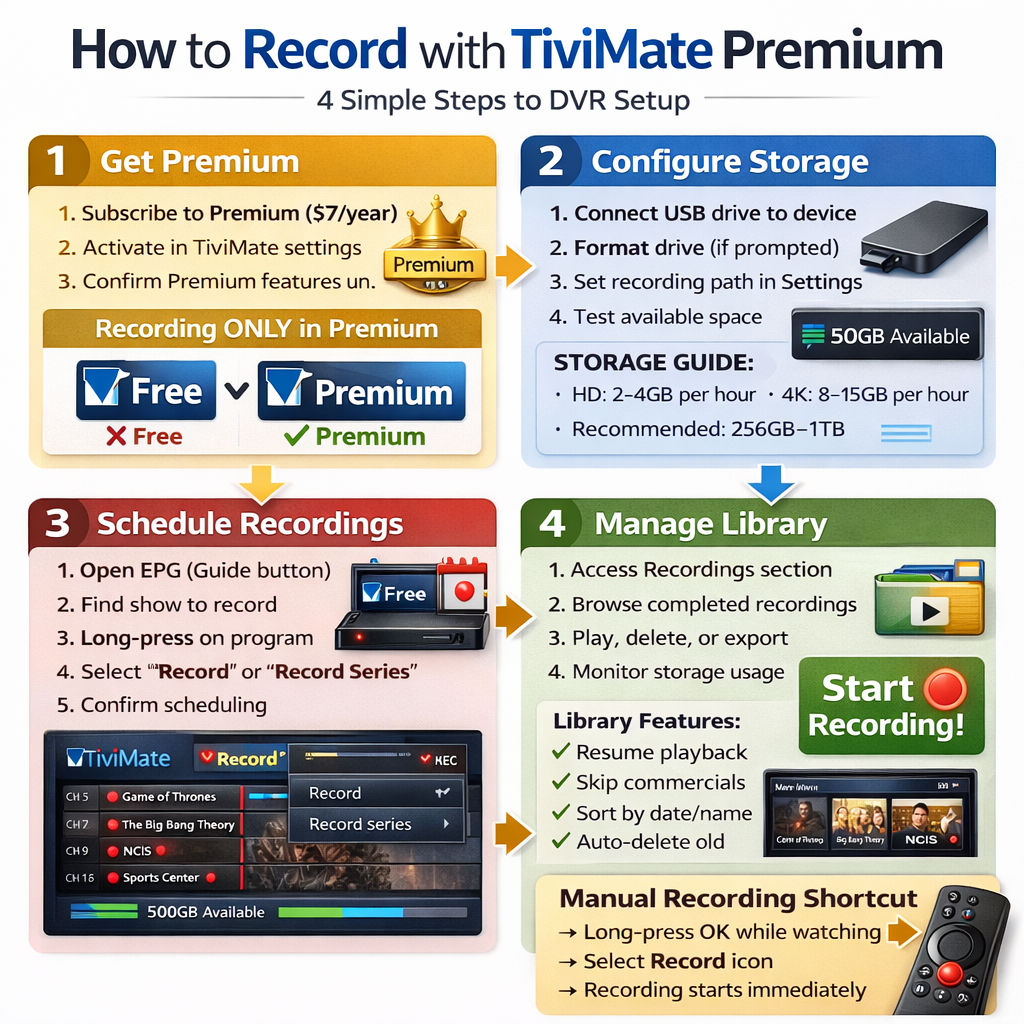
Before diving into the how-to, understand that recording is a TiviMate Premium exclusive feature. The free version cannot record anything this is by design to incentivize the modest $7 annual subscription.
What TiviMate Premium offers for recording:
Unlimited Recording Capacity Record as many shows simultaneously as your device and storage allow. No artificial limits imposed by the app only your hardware constraints matter.
Series Recording Set up automatic recording for entire TV series. TiviMate records every episode as it airs without manual scheduling each time.
Scheduled Recordings Schedule recordings days or weeks in advance using the EPG. Never worry about missing live airings of your favorite programs.
Recording Management Built-in library organizes all recordings with thumbnails, descriptions, and metadata. Delete, rename, and browse recordings easily.
Catch-Up Recording Some IPTV providers support catch-up TV. Record shows that already aired using TiviMate’s catch-up integration.
The $7 yearly cost pays for itself immediately if you value recording functionality. Learn more about whether TiviMate Premium is worth it for your needs.
Prerequisites for Recording with TiviMate
Successfully recording with TiviMate Premium requires meeting several technical requirements. Missing any of these prevents recording from working properly.
1. TiviMate Premium Subscription Purchase from within TiviMate app or Google Play Store. Annual subscription ($6.99) or monthly option available. Free version cannot record anything.
2. Compatible IPTV Service Your IPTV provider must support recording/timeshift functionality. Not all services allow recording check with provider before subscribing. Most premium IPTV services support recording without issues.
3. Adequate Storage Space Recording consumes significant storage. One hour of HD content requires 2-4GB. 4K recordings need 8-15GB per hour. Ensure sufficient free space on device or external storage.
4. External Storage (Recommended) Fire TV Sticks and Android boxes have limited internal storage. USB flash drives or external hard drives dramatically increase recording capacity. Format as portable or internal storage.
5. Stable Internet Connection Recording requires consistent connection during entire recording duration. Minimum 10 Mbps for HD, 25 Mbps for 4K. Unstable connections create incomplete or corrupted recordings.
6. Working EPG Data Electronic Program Guide is essential for scheduling recordings. Without EPG, you can only record manually. Learn how to add EPG to TiviMate correctly.
Meeting all prerequisites ensures smooth recording experience without frustrating technical problems.
Setting Up Storage for TiviMate Recordings
Proper storage configuration is critical before you record with TiviMate Premium. Default internal storage fills quickly with recordings, causing device slowdowns and recording failures.
Internal Storage Setup:
- Go to TiviMate Settings
- Select Recording
- Choose Recording Path
- Select Internal Storage location
- Confirm selection
Internal storage works for occasional recordings but isn’t suitable for heavy DVR use.
External USB Storage Setup (Recommended):
- Connect USB drive or external hard drive to device
- Format drive when prompted (choose Portable Storage)
- Open TiviMate Settings > Recording
- Tap Recording Path
- Select your external USB drive
- Choose folder for recordings
- Confirm and test recording
External Storage Tips:
USB 3.0 drives recommended for faster recording and playback. USB 2.0 works but limits recording multiple streams simultaneously.
SSD drives outperform traditional hard drives for reliability and speed. USB flash drives work for budget setups but wear out faster.
Partition large drives into separate sections for recordings, media, and backups. This organizes content and prevents recording from consuming entire drive.
Always safely eject external storage before unplugging. Removing drives during recording corrupts files and risks data loss.
With proper storage configured, you’re ready to start recording. For complete device setup, check my guide on installing TiviMate on Firestick and Android TV.
How to Record Live TV Manually
Manual recording captures whatever is currently playing on a channel. This is simplest recording method for spontaneous viewing.
Quick Recording Steps:
- Navigate to channel you want to record
- Press and hold Select/OK button on remote
- Quick menu appears with recording option
- Tap Record icon (red circle)
- Recording starts immediately
- Recording continues until you manually stop
Stopping Manual Recordings:
- Return to channel being recorded
- Press and hold Select/OK again
- Tap Stop Recording icon
- Recording saves to storage automatically
Alternative Method:
- While watching channel, press Menu button
- Select Record from options
- Choose recording duration if prompted
- Confirm to start recording
Manual recording works perfectly for capturing unexpected moments during live TV viewing. Sports highlights, breaking news, or surprising show content records instantly without scheduling.
Scheduling Recordings Using EPG
The Electronic Program Guide transforms TiviMate into a proper DVR system. Schedule recordings days in advance for shows airing when you’re busy or asleep.
Basic Scheduled Recording:
- Open TiviMate EPG (press Guide button)
- Browse to show you want to record
- Long-press on program title
- Select Record from menu
- Confirm recording is scheduled (red dot appears)
Recording Options:
When scheduling, TiviMate offers customization options:
Recording Padding Add extra time before and after scheduled recording. Prevents missing show beginnings/endings due to schedule inaccuracies. Recommended: 2-5 minutes each direction.
Recording Quality Some services offer quality selection. Choose between SD/HD/4K based on storage and bandwidth. Higher quality consumes more space and requires faster internet.
Series Recording Enable to record all episodes automatically. TiviMate identifies series and schedules future episodes as EPG updates. Perfect for weekly shows.
Advanced EPG Recording Features:
Search and Record Use EPG search to find specific shows across all channels. Schedule recordings from search results directly.
Filter by Category View only movies, sports, news, or specific genres. Schedule recordings for entire category (like all NFL games).
Calendar View See all scheduled recordings organized by date. Manage conflicts and plan recording capacity.
Scheduled recording with EPG is how to record with TiviMate Premium like a professional DVR system.
Setting Up Series Recording
Series recording is TiviMate Premium’s most powerful feature for TV show enthusiasts. Record entire seasons automatically without individual episode scheduling.
Enable Series Recording:
- Open EPG and find any episode of desired series
- Long-press on episode title
- Select Record Series instead of single episode
- Configure series recording options
- Confirm setup
Series Recording Configuration:
Record All Episodes Captures every airing including reruns. Useful for syndicated shows with unpredictable schedules.
New Episodes Only Records only fresh episodes, skipping reruns. Relies on EPG metadata marking episodes as new accuracy varies by IPTV provider.
Specific Days/Times Limit series recording to particular time slots. Prevents recording daytime reruns when you only want primetime airings.
Maximum Episodes to Keep Automatically delete oldest recordings when limit reached. Manages storage by keeping only recent episodes. Set to 5-10 for weekly shows.
Managing Series Recordings:
Go to Settings > Recording > Series to view all active series recordings. Edit settings, cancel series, or check upcoming episodes scheduled.
Series recording saves hours of manual scheduling and ensures you never miss episodes of ongoing shows.
Managing Your Recording Library
As recordings accumulate, proper organization becomes essential. TiviMate Premium includes management tools keeping your library organized.
Accessing Recordings:
- From TiviMate home screen, select Recordings
- View all recorded content with thumbnails
- Sort by date, name, duration, or channel
- Filter by status (completed, in-progress, scheduled)
Playback Features:
Resume Playback TiviMate remembers where you stopped watching. Resume from exact position or restart from beginning.
Fast Forward/Rewind Skip commercials or replay key moments. Adjustable skip intervals (10s, 30s, 60s) in settings.
Speed Playback Watch at 1.25x or 1.5x speed. Catch up on shows faster while maintaining audio clarity.
Subtitle Support Enable closed captions if included in recording. Configure subtitle appearance in settings.
Recording Information:
Long-press any recording to view details:
- Original air date and time
- File size and duration
- Recording quality/format
- Channel source
- EPG description
Deleting Recordings:
Individual deletion: Long-press recording, select Delete Batch deletion: Select multiple recordings, choose Delete All Automatic deletion: Configure in series recording settings
Exporting Recordings:
Recordings save as standard video files (.ts or .mp4 format). Copy to computer via file manager for permanent backup or viewing on other devices.
Proper library management prevents storage issues and keeps recordings accessible when needed.
Recording Best Practices and Tips
Following these best practices ensures reliable recordings and optimal storage usage when you record with TiviMate Premium.
Storage Management:
Monitor available space regularly. Check before scheduling large recordings (sports events, movies). Set alerts for low storage if your device supports it.
Use external storage whenever possible. Internal device storage is limited and affects overall performance when full.
Delete watched recordings promptly. Configure automatic deletion for series recordings to prevent buildup.
Compress archived recordings if keeping long-term. Third-party tools can reduce file sizes by 50-70% without major quality loss.
Recording Quality:
Match quality to content importance. Use HD for favorite shows, SD for less critical content. This conserves bandwidth and storage.
Test recordings before events. Schedule test recording on target channel before important live events. Verify quality and settings work correctly.
Avoid recording during peak hours if bandwidth is limited. Schedule recordings during off-peak times (overnight, early morning) when internet congestion is minimal.
Schedule with padding. Always add 2-5 minutes before/after scheduled recordings. EPG times aren’t always accurate and shows often run over.
Backup Important Recordings:
Copy irreplaceable content to computer or cloud storage. Device failures happen backup prevents permanent loss of important recordings.
Use redundant storage for critical recordings. Record to two different locations simultaneously if possible.
Technical Optimization:
Close unnecessary apps before recording. Background apps consume bandwidth and processing power affecting recording quality.
Use wired connection when recording. WiFi reliability issues can interrupt recordings. Ethernet cable ensures consistent connection.
Keep TiviMate updated. New versions include recording improvements and bug fixes. Update regularly for best performance.
These practices maximize recording success rates and minimize frustration from failed or corrupted recordings.
Troubleshooting Recording Issues
Even with proper setup, recording problems occasionally occur. Here are solutions to common issues when you record with TiviMate Premium.
Problem: Recording option is grayed out
Your IPTV provider doesn’t support recording for this channel. Contact provider to confirm recording availability. Try different channel to test if issue is provider-wide or channel-specific.
Problem: Recording stops unexpectedly
Check available storage space recordings fail when storage fills. Verify internet connection remained stable during recording. Test connection stability before scheduling important recordings. Ensure device didn’t enter sleep mode during recording. Adjust power settings to prevent sleep.
Problem: Recorded files won’t play
Recording may have corrupted due to connection interruption. Try playing on computer to verify file integrity. Check file format compatibility some players don’t support all formats. Use VLC media player for maximum format compatibility.
Problem: Series recording not capturing new episodes
Verify EPG data updates regularly. Go to Settings > Playlists > Update EPG. Check if IPTV provider marks new episodes correctly in EPG metadata. Series recording relies on accurate episode information.
Problem: Recording quality is poor despite HD channel
Your internet speed may not support HD recording. Test speed during recording times. Provider may throttle IPTV traffic during peak hours. Use VPN for TiviMate to prevent throttling. Adjust recording quality settings if available.
Problem: Can’t find completed recordings
Verify recording path hasn’t changed. Go to Settings > Recording > Recording Path. Check external storage is connected if using USB drive. Recordings disappear when USB disconnects.
Problem: TiviMate crashes during recording
Clear app cache: Settings > Apps > TiviMate > Clear Cache. Update to latest TiviMate version. Restart device completely before scheduling important recordings. Reduce number of simultaneous recordings if device struggles.
For additional troubleshooting help, my TiviMate buffering guide covers connection issues affecting recordings.
Recording on Different Devices
Recording performance varies across streaming devices. Understanding device limitations helps set appropriate expectations.
Fire TV Stick Recording:
Works well with external USB storage via OTG adapter. Internal storage too limited for serious recording. Stick models struggle recording multiple HD streams simultaneously. Fire TV Stick 4K Max handles recording better than older models.
Android TV Box Recording:
Best overall recording platform due to powerful processors and multiple USB ports. Can record multiple streams simultaneously without issues. Large internal storage plus external drive support. Recommended for heavy recording users.
Nvidia Shield TV Recording:
Premium option with excellent recording performance. Handles 4K recording smoothly with multiple simultaneous recordings. Built-in storage plus expandable options. AI upscaling improves playback quality of recordings.
Budget Android Devices:
Basic boxes struggle with HD recording, especially multiple streams. Limit to single SD recording for reliable results. Invest in better hardware if recording is priority.
Storage Recommendations by Device:
- Fire TV Stick: 64-128GB USB drive minimum
- Android TV Box: 256GB-1TB external drive
- Nvidia Shield: 500GB-2TB for extensive library
- Budget devices: 32-64GB sufficient for limited recording
Choose device matching your recording ambitions for best experience.
Legal Considerations for Recording
Recording IPTV content exists in legal gray areas. Understanding the landscape helps you make informed decisions.
Legal Recording Scenarios:
Recording from legitimate IPTV services that license content legally is similar to cable DVR use. Most countries allow personal recording for time-shifting purposes under fair use doctrines.
Gray Area Recordings:
Recording from services streaming unlicensed content involves piracy concerns. You’re creating permanent copies of potentially pirated material. Legal liability varies by jurisdiction.
Best Practices for Legal Protection:
Use reputable IPTV services that license content properly. Explore options in my best IPTV providers guide. Keep recordings for personal viewing only never share or distribute. Delete recordings after viewing rather than building large libraries. Use VPN for additional privacy protection when recording.
IPTV Service Terms:
Check your provider’s terms of service regarding recording. Some explicitly allow recording, others prohibit it. Violating terms can result in account suspension.
Recording from over-the-air broadcasts or properly licensed streaming services is clearly legal. Recording from questionable IPTV sources carries risks worth considering.
Final Thoughts on Recording with TiviMate Premium
Learning how to record with TiviMate Premium unlocks the full potential of your IPTV setup. The recording features rival expensive cable DVR systems at a fraction of the cost just $7 annually plus storage costs.
Proper configuration with adequate storage, stable internet, and working EPG creates reliable DVR experience. Series recording automates capturing your favorite shows while manual recording handles spontaneous content.
TiviMate Premium’s recording functionality alone justifies the subscription for anyone serious about IPTV streaming. Stop watching TV on broadcasters’ schedules and start recording to watch on your time.
For more TiviMate optimization tips and IPTV streaming guides, explore my comprehensive IPTV player guide 2026 covering everything you need to know.